What are Favorite Users?
When you send an ePak to some recipients, those recipients are automatically added to your Favorite User list. The next time you create an ePak and begin typing a recipient name into a workflow state, it will first search your Favorite User list for any matching users. This greatly increases the speed at which you may add a regularly used recipient to a workflow. At the bottom of the Favorite User list there is a Search more link. If you desire to see all matching recipients (and not only previously used Favorite Users) then you may click the Search more link, and it will search the entire user list for all matching users.
The Favorite User list will be available on the Compose page (when adding a recipient to a workflow), on Pending ePaks (ePak Edit tab – when replacing a recipient in a workflow) and on the Signing page (when a Signer delegates to another recipient).

Contact Us
Great, Thank you!
How do I use ‘Minimum Users’ feature in my Workflow?
When you are creating a Workflow and you add a sign or review state to the workflow, you will see that there is a checkbox for minimum user. You may check the checkbox and then enter the minimum number of users into the number box that appears. By default, the number 1 will be in the minimum user box. Once the minimum number of users have approved the ePak documents, the ePak will progress to the next State in the Workflow.
For example, you may create a Workflow with 5 users in a Review or Sign State. You may then choose to set minimum users to 2. When you send the ePak, all 5 users will receive an email notification. However, once the first 2 users respond and approve the ePak, the ePak will then move to the next Workflow State. The remaining 3 users will receive a notice that they no longer need to perform any action on the ePak.
This is extremely helpful if you have a team of Reviewers available, but you only need approval of few. It helps your ePak progress through the workflow faster.

How do I use ‘Minimum Users’ feature in my Workflow?
When you are creating a Workflow and you add a sign or review state to the workflow, you will see that there is a field for minimum user. You may enter the minimum number of users in the box. By default, the number 0 will be selected in the minimum user box. Once the minimum number of users have approved the ePak documents, the ePak will progress to the next State in the Workflow.
This is extremely helpful if you have a team of Reviewers available, but you only need the approval of a few. It helps your ePak progress through the workflow faster.

Contact Us
Great, Thank you!
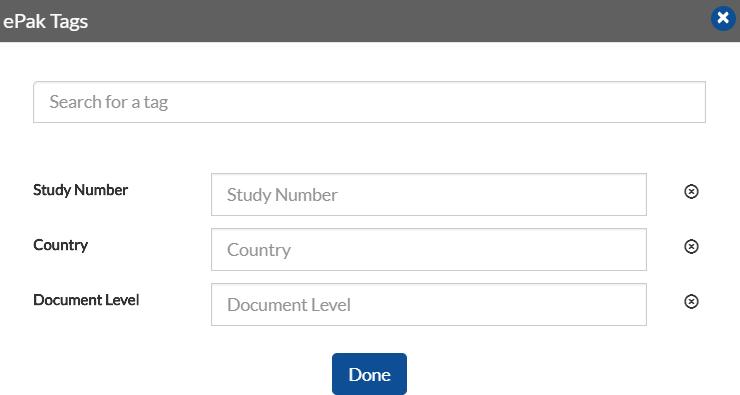
How do I use ePak Tags?
Keyword or Search tags have now been replaced by ePak Tags. It can be configured to provide a list of predetermined ePak tags to the Custodian, such as:
- Study Number
- Site Number
- CDP
- Country
- Document Level
- Document Type
- Keyword
To associate a Tag while creating your ePak, click the Add Tags button at the bottom of the Compose page. A Search Box will appear, and you may search for available ePak Tags. Select the Tag(s) that you wish to add. The ePak Tag will appear beneath the Search Box. You may then configure the Tag value. It may allow you to enter text, check a box, or make a selection from a dropdown list – depending on the type of ePak Tag you have selected. If you need a specific ePak Tag added to the system, please contact your Administrator.
Can a custodian associate an epak tag with an epak?
A Custodian, while composing an epak, can now associate an ePak tag with an ePak if needed at the tenant level. The tag will record the metadata which will later be extracted from reports.


Contact Us
Great, Thank you!
How do I save an ePak as a Draft?
MSB users have an option to manually save an ePak with Draft status for later use. Users can view a different folder named “Drafts” under the “sent ePaks” section and all drafted ePak will be listed there.

How do I save an ePak as a Draft?
MSB users have an option to manually save an ePak with Draft status for later use. Users can view a different folder named “Drafts” under the “sent ePaks” section and all drafted ePak will be listed there.


Contact Us
Great, Thank you!
How do I add watermark to a Document?
If the setting is enabled for the tenant, MSB will add watermark text to all/alternate pages of the attached PDF. The watermark text, color, opacity, font family, orientation, alternate pages, and internal/external/all users affected are configurable in the tenant settings.

Contact Us
Great, Thank you!
How do I clone an existing ePak?
MSB allows users to clone an existing ePak. The feature is configurable and by default the ePak clone feature will be disabled. Custodian can select an ePak from any of the sent folders and click on Clone button. System will display a compose page with the ePak workflow and documents.


Contact Us
Great, Thank you!
How can a user merge multiple documents during upload?
MSB allows the Custodian users to merge multiple uploaded files into a single document. The user will be able to designate the order of the files in the merged document. The user will also be able to change the name of the merged document. A message will be displayed if the size of the merged document exceeds the allowed upload size.


Contact Us
Great, Thank you!
How do I use the Email Attachment Type feature?
When composing an ePak (or creating a Workflow template) you may choose if you would like app to email a copy of the document to all the users in your workflow upon completion of the ePak:
- None: If set to none, it will not email the signed documents to all recipients in the workflow.
- Signed: If set to Signed, it will email the signed original documents to all recipients in the workflow.
- ePhotocopy: If set to ePhotocopy, it will email an ePhotocopy to all recipients in the workflow.
Every signing policy will have a default value set against it, but a custodian can over-ride it while composing the ePak. The default value will be configurable on every instance and can be set as desired. As a custodian, this gives you a greater control over what documents are shared with whom, and the method in which they are shared.

How do I use the Email Attachment Type feature?
When composing an ePak (or creating a Workflow template) you may choose if you would like MSB to email a copy of the document to all the users in your workflow upon completion of the ePak:
- None: If set to none, MSB will not email the signed documents to all recipients in the workflow.
- Signed: If set to Signed, MSB will email the signed original documents to all recipients in the workflow.
- ePhotocopy: If set to ePhotocopy, MSB will email an ePhotocopy to all recipients in the workflow.
- All: If set to All, MSB will email the signed original documents and an ePhotocopy to all recipients in the workflow.
Every signing policy will have a default value set against it, but a custodian can over-ride it while composing the ePak. The default value will be configurable on every instance and can be set as desired. As a custodian, this gives you a greater control over what documents are shared with whom, and the method in which they are shared.

Contact Us
Great, Thank you!
How do I use the ‘Allow Delegation’ feature?
If your instance has been configured to allow custodians to control the delegation of an ePak to a signer other than the one nominated by you, you will see a toggle switch on the Compose page at top of the ePak preview panel. If set to ‘ON’- the signer(s) in the workflow may delegate signing the ePak to another Signer (for any given reason) but if set to ‘OFF’- the signer(s) in the workflow will have to either sign or reject the ePak, giving reasons in both case but not have an option to delegate signing to someone else.

How do I use the ‘Allow Delegation’ feature?
If your instance has been configured to allow custodians to control the delegation of an ePak to a signer other than the one nominated by you, you will see a toggle switch in the Advanced Settings on the Compose page. If set to ‘ON’- the signer(s) in the workflow may delegate signing the ePak to another Signer (for any given reason) but if set to ‘OFF’- the signer(s) in the workflow will have to either sign or reject the ePak, giving reasons in both case but not have an option to delegate signing to someone else.

Contact Us
Great, Thank you!
What is ‘Secure Document’ option on the compose page and how do I use it?
With ‘Secure Document’ feature you can now add an extra level of security to your ePaks while sending them out for signatures/review. As a custodian, you can enable the ‘Secure Document’ option on the Compose screen to lock the document with a password and the ePak recipients will be required to enter the same password to access the documents for signing. You can relay the password to your signers by various means such as phone, text or an email. However, for security reasons, we recommend you must not share the same password through special instructions column on the compose screen.
To secure your documents:
- Compose the ePak as usual and use the ‘Secure Document’ toggle on the top of the document preview panel to turn on the feature.

- Click Send when you’re done creating your ePak.
- You will now be prompted to set a password of your choice or let the system generate one for you. You can then copy and communicate the password to all the signers in the workflow. It will also send you the password in a separate email.
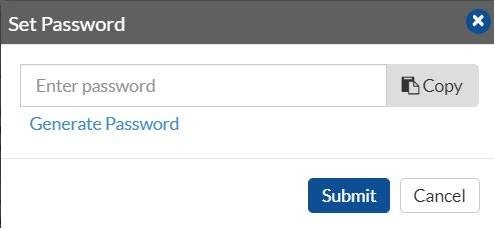
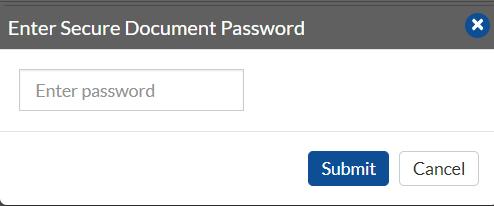
- When you send your ePak, the recipient must provide the same password as set by you in order to open the ePak. After the password has been correctly entered, the signer will be taken through the normal signing process.
What is ‘Secure Document’ option on the compose page and how do I use it?
With ‘Secure Document’ feature you can now add an extra level of security to your ePaks while sending them out for signatures/review. As a custodian, you can enable the ‘Secure Document’ option on the Compose screen to lock the document with a password and the ePak recipients will be required to enter the same password to access the documents for signing. You can relay the password to your signers by various means such as phone, text or an email. However, for security reasons, we recommend you must not share the same password through special instructions column on the compose screen.
To secure your documents:
- Compose the ePak as usual and use the ‘Secure Document’ toggle in the Advanced Settings to turn on the feature.

- Click Send when you’re done creating your ePak.You will now be prompted to set a password of your choice or let the system generate one for you. You can then copy and communicate the password to all the signers in the workflow. It will also send you the password in a separate email.

- When you send your ePak, the recipient must provide the same password as set by you in order to open the ePak. After the password has been correctly entered, the signer will be taken through the normal signing process.

Contact Us
Great, Thank you!
What is ‘Fast Web View’ feature?
If your instance has been configured to support Fast Web View (FWV) enabled PDFs, you will see an option on the compose page to maintain this feature for your uploaded PDF even after it is signed. These FWV enabled PDFs are optimized for page-at-a-time downloading. Since non-linearized PDFs must be completely downloaded before they can be viewed, this process drastically reduces the lag between clicking on a PDF link and actually seeing that PDF in a viewer. The improvement in performance can be particularly marked when the PDF in question is very large.
However, this is limited to single signature only and a PDF with more than one signature tag will lose the FWV property.
As a custodian, you can set this property to ON and maintain it after the signature has been applied to the PDF.
Contact Us
Great, Thank you!
How do I use ‘CC users’ feature?
For instances when you don’t want the recipient to take any action on the ePak but only receive the fully executed copy of it, CC field will come into action. You are only required to add the email address of such user(s) into the field designated for it on the compose page in any order.

How do I use ‘CC users’ feature?
For instances when you don’t want the recipient to take any action on the ePak but only receive the fully executed copy of it, CC field will come into action. You are only required to add the email address of such user(s) into the field designated for it on the ePak summary page in any order.

Contact Us
Great, Thank you!
How do I see the progress of a bulk compose?
Users will be able to track and manage the progress of a bulk compose and bulk compose + stamp paper process by navigating to the batch management page where the Custodian can view the details like Batch No and Name, Operation Type, Status, Progress, Number of Entries Sent/Total Entries and Created On for each Batch.

When a user successfully initiates a bulk compose process, a toast message with the format “Bulk compose with batch no: [Batch Number] has started” will be displayed on the bulk compose screen.

A Custodian will be able to Search, Filter, terminate a Batch and view individual entries withing a Batch.
For each individual entry, the custodian will be able to Download CSV Report and see the details like ePak Subject, Signers, Index, Status, started on and Finished On.


Contact Us
Great, Thank you!
What are the various types of tags/fields allowed?
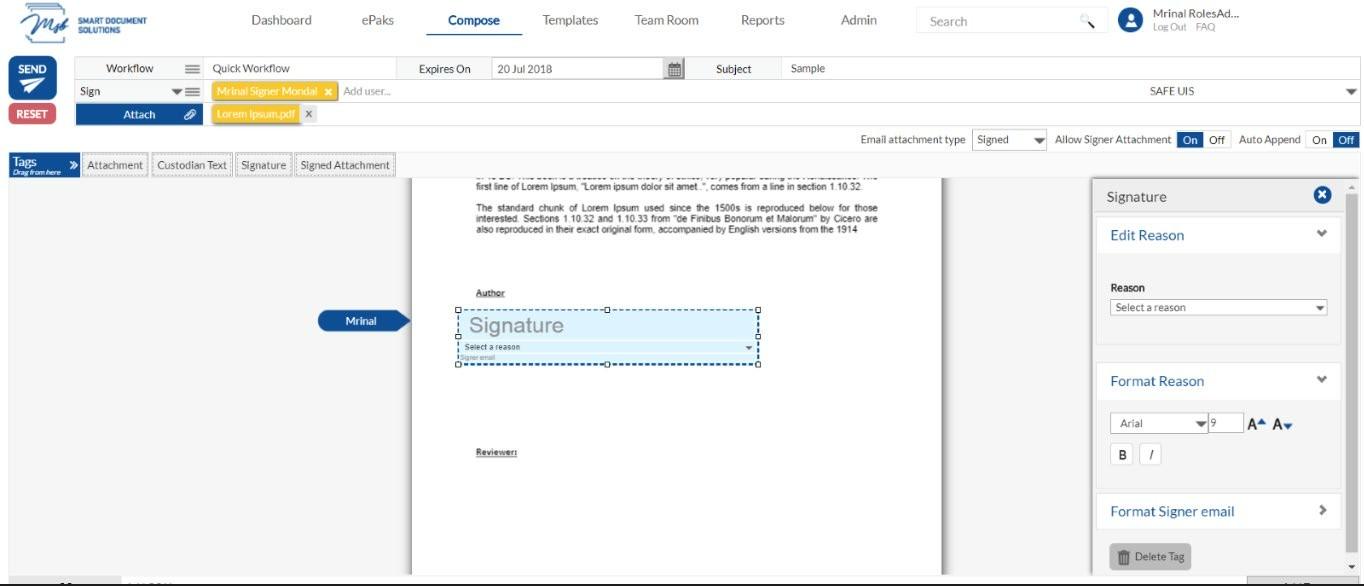
Depending on the signature certificate policy, you would have choice to select from various tags on a document. These tags indicate locations on a document where the recipient needs to take an action and to provide information for the recipient. A few tags are automatically filled by the system like date and time stamp. You can set properties of the tags by clicking on the tag and making changes in the panel on the right. The different tags are as follows:
- Signature: Place this tag where the recipient must sign the document.
- Initials: Place this tag where the recipient must initial the document.
- Reason: Place this tag where you want the signing reason to get stamped onto the document.
- Signer Name: Place this tag on the document where you want the signer’s name to appear.
- Signer Title: Place this tag on the document where you want the recipient’s title to appear.
- Signer Text: Place this tag on the document where you want the recipients to enter some custom data.
- Time Stamp: Place this tag on the document where you want the date and the time the recipient signed the document to appear.
- Attachment: This is where the recipient initiates the process of adding supporting documents to an ePak.
- Signed Attachment: This tag will allow the recipient to attach supporting documents to an ePak after attesting them.
- Custodian Text: Use this tag to enter some custom text.
- Custodian Text: This is a free text one-line field for data and is used to allow the recipient to enter different information.
- Custom Text Area: This free-text field is a multi-line field to allow recipient enter descriptive information like comments, suggestions etc. within a fixed-width field.
- Checkbox: Place this tag on the document in a location where the recipient can select one or more options.
- Image Tag: Place this tag on the document where you want the recipient to upload an image and the uploaded image will be printed in the tag size defined by the custodian.
What are the various types of tags/fields allowed?
Depending on the signature certificate policy, you would have the choice to select from various tags on a document. These tags indicate locations on a document where the recipient needs to take action and to provide information for the recipient. A few tags are automatically filled by the system like date and time stamp.
You can set properties of the tags by clicking on the tag and making changes in the panel on the right. The different tags are as follows:
-Signature: Place this tag where the recipient must sign the document.
-Signer Name: Place this tag on the document where you want the signer’s name to appear.
-Date & Time: Place this tag on the document where you want the date and time the recipient signed the document to appear.
-Signer Initials: Place this tag where you want the signer’s initials to appear.
-Signer Title: Place this tag on the document where you want the recipient’s title to appear.
-Signer Text: Place this tag on the document where you want the recipient to enter some custom data.
-Signing Reason: Place this tag where you want the signing reason to get stamped onto the document.
-Custodian Text: Use this tag to enter some custom text.
-Custom Text: This is a free text one-line field for data and is used to allow the recipient to enter different information.
-Custom Text Area: This free-text field is a multi-line field to allow recipient to enter descriptive information like comments, suggestions etc. within a fixed-width field.
-Attachment: This is where the recipient initiates the process of adding supporting documents to an ePak.
-Signed Attachment: This tag will allow the recipient to attach supporting documents to an ePak after attesting them.
-Upload Image: Place this tag on the document where you want the recipient to upload an image and the uploaded image will be printed in the tag size defined by the custodian.
-Checkbox: Place this tag on the document in a location where the recipient can select one or more options.
Contact Us
Great, Thank you!
How do I place and resize Tags?
The various tags available to you will depend on what Certificate Policy you are using. Once you select a Certificate Policy for your ePak, the toolbar above your document working area will populate all the available tags to choose from. Some Certificate Policies may only have a Signature block tag available, while others have additional Tags such as Signer Name, Date/Time, Reason, Initial, etc. After you upload your document, you can drag and drop tags as per your requirement. To resize them:
- Simply click on a Signer in your workflow (they will be highlighted yellow when selected).
- Click and drag a tag from the toolbar above the document and release it on the desired place in the document. The tag will appear.
- You will notice that the tag has “handles” (small boxes in the corners) that you can click and drag to increase and decrease the size of the tag.
- Additional controls appear in the Tag Resize Panel to the right of the document, allowing you to control the font, font size and other attributes such as bold or italic. For a few tags like Custom Text and Custom Text Area you can even control properties like the label and the Placeholder text.
- You may move the tag by clicking on the blue area and dragging and releasing it.
How do I place and resize Tags?
The various tags available to you will depend on what Certificate Policy you are using. Once you drop the tags on your ePak, click the gear icon and the panel on the right will show all the options to control the Height, Width, font, font size and other attributes such as bold or italic.

For a few tags like Custom Text and Custom Text Area you can even control properties like the label and the Placeholder text.
Contact Us
Great, Thank you!
How do I use the Auto-append feature?
If your instance has been configured to enable Auto-append, you will see an Auto-append option on the toolbar above your document on the Compose page. By default, Auto-append is set to OFF. If you wish, you may set Auto-append to ON. Setting Auto-append to ON will tell application to automatically append a signature page to the end of your document and place all signature tags there. You will not be required to drag and drop any signature tags onto your document for your signers.
If you turn auto-append to on after you have manually placed a few signature tags onto the document, it will delete all those tags and will warn you once before doing so. It will handle the placement of your signature tags automatically by adding a signature page to the end of your document.

How do I use the Auto-append feature?
If your instance has been configured to enable Auto-append, you will see an Auto-append option in the Advanced Settings on the Compose page. By default, Auto-append is set to OFF. If you wish, you may set Auto-append to ON. Setting Auto-append to ON will tell application to automatically append a signature page to the end of your document and place all signature tags there. You will not be required to drag and drop any signature tags onto your document for your signers.
If you turn auto-append to on after you have manually placed a few signature tags onto the document, it will delete all those tags and will warn you once before doing so. It will handle the placement of your signature tags automatically by adding a signature page to the end of your document.

Contact Us
Great, Thank you!
How do I use the Allow Signer Attachment feature?
If your instance has been configured to enable a Signer to upload an attachment, you will see an Allow Signer Attachment option on the toolbar above your document on the Compose page.
If you set the Allow Signer Attachment option to ON, then Signers in your ePak will have a choice to attach a document to the ePak that you are composing. Any document the Signer attaches will be visible to all of your ePak recipients. The signer will be able to choose if they need to sign the document that they attach to the ePak. Alternatively, you may drag and drop the Attachment or Signed Attachment tags onto your ePak document which will then be mandatory for signers to fulfil. In case of Attachment tag, the signer will be allowed to attach a document to the ePak by clicking the tag and it may or may not be signed. However, in case of Signed attachment tag, the signer will be allowed to attach a document to the ePak and will need to sign it.

How do I use the Allow Signer Attachment feature?
If your instance has been configured to enable a Signer to upload an attachment, you will see an Allow Signer Attachment option in the Advanced Settings on the Compose page.
If you set the Allow Signer Attachment option to ON, then Signers in your ePak will have a choice to attach a document to the ePak that you are composing. Any document the Signer attaches will be visible to all of your ePak recipients. The signer will be able to choose if they need to sign the document that they attach to the ePak. Alternatively, you may drag and drop the Attachment or Signed Attachment tags onto your ePak document which will then be mandatory for signers to fulfil. In case of Attachment tag, the signer will be allowed to attach a document to the ePak by clicking the tag and it may or may not be signed. However, in case of Signed attachment tag, the signer will be allowed to attach a document to the ePak and will need to sign it.

Contact Us
Great, Thank you!
How do I create an ePak for signature?
It gives you an option to create a single ePak or compose multiple ePaks using our ‘Batch Compose’ feature. To know more about ‘Batch Compose’ please refer to What is ‘Batch Compose’? and How do I send multiple ePaks at once?
To create a single ePak:
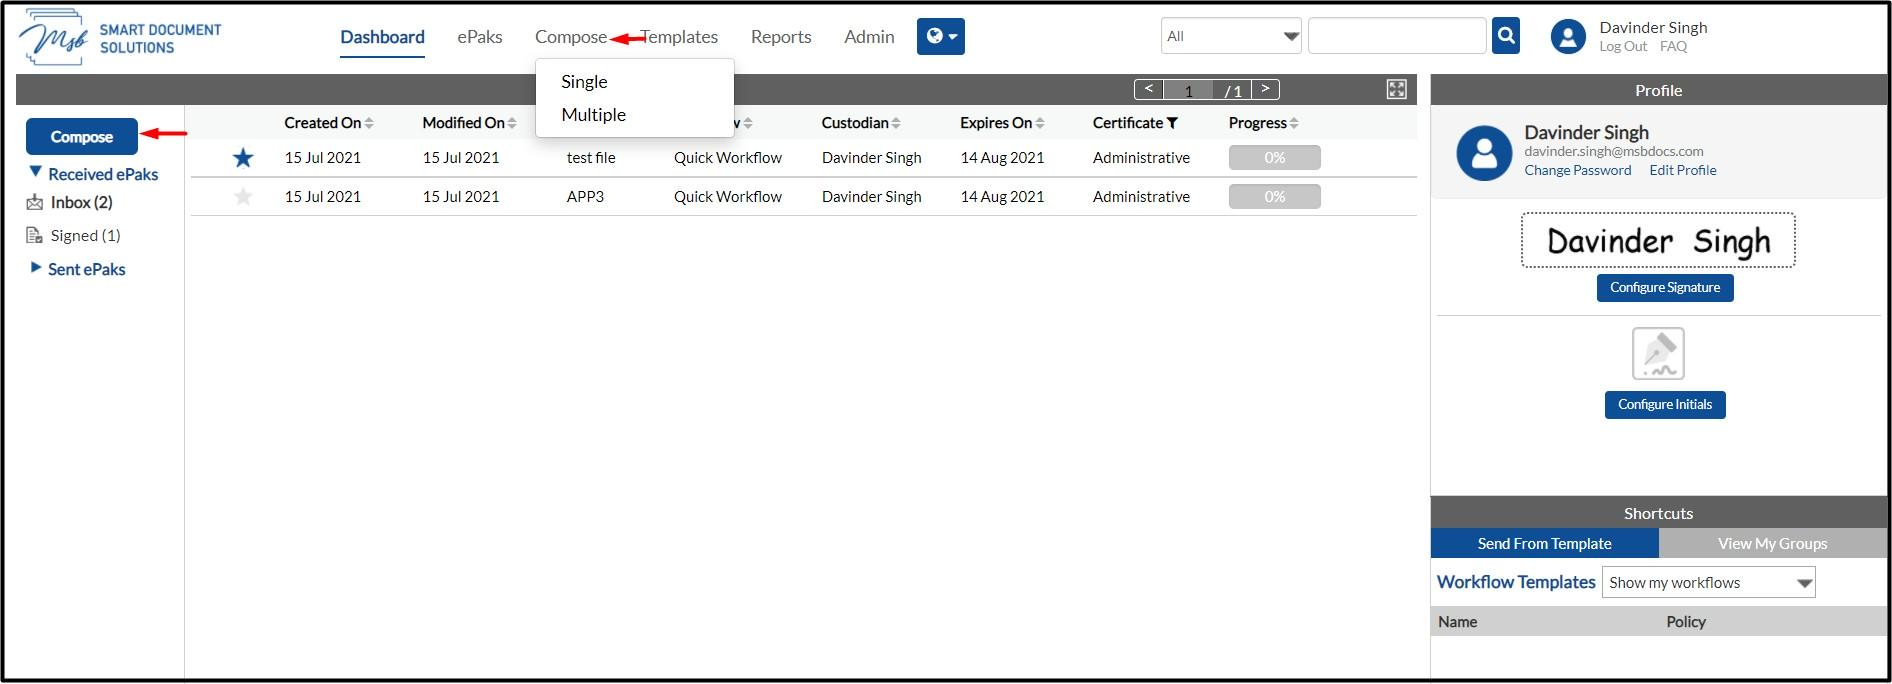
- Click on the Compose tab available in the main navigation bar at the top of the page and choose single or you may choose the Compose button just above the ePak folders on the Dashboard.
- Click Attach.
- You can choose to upload a file from
- Your system
- My Documents (previously uploaded files)
- Existing document templates
- OneDrive (If configured for your instance)
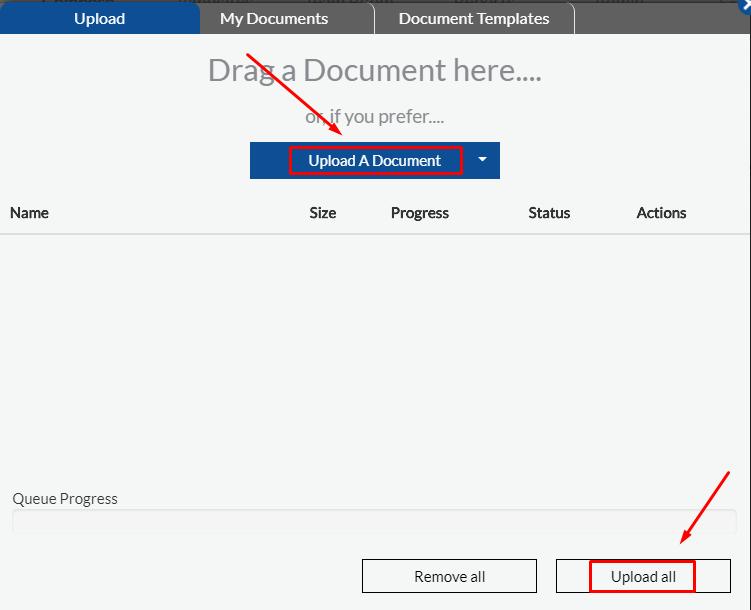
- To choose from available documents in your system, click upload and navigate to the location for the file, select it and click the Open button.
If OneDrive has been enabled for your instance, as a custodian you will have an option to select OneDrive from the drop down.
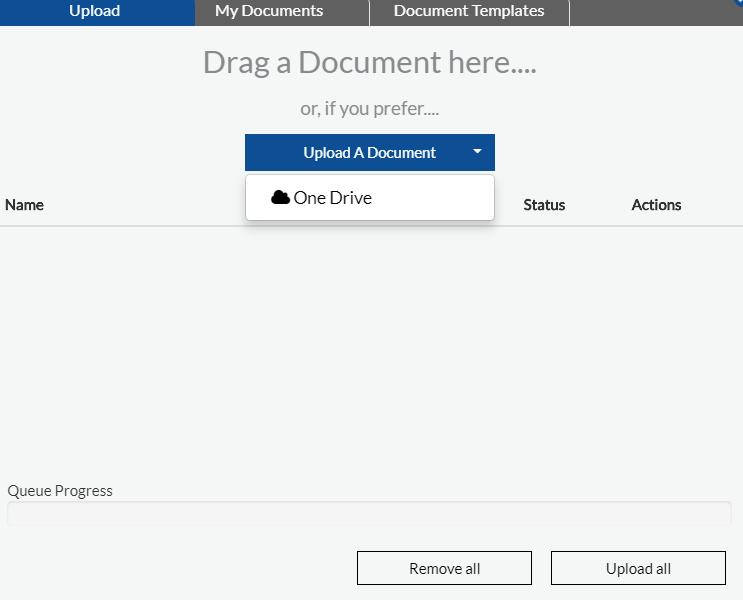
- You may choose to upload multiple files at one time.
- Then click on Upload all and all the uploaded documents will get attached to the ePak on the compose page.
- Optionally, to choose from previously updated documents- enter text for a Document Name in the search box and it displays the specific document(s) from the list of available documents that will match the criteria.
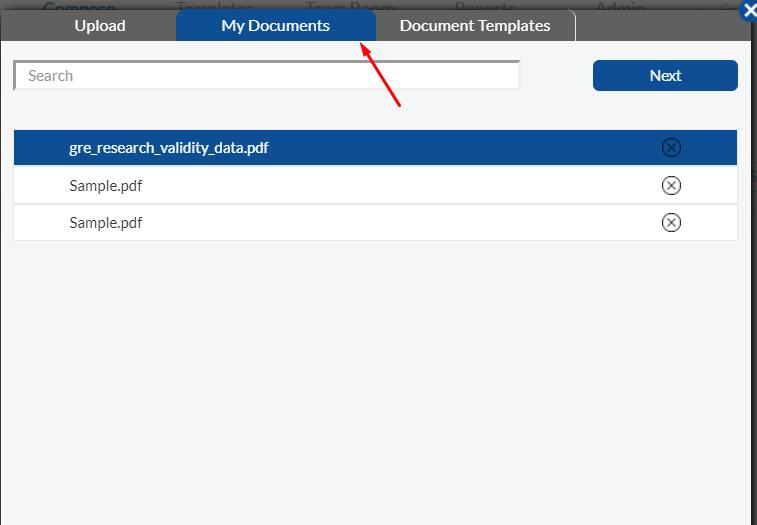
- Upon clicking Next, the document(s) will be loaded in the document preview on the compose page.
- Now you may either use an existing Workflow or create a quick workflow.
- To use an existing workflow, click the icon on the workflow tab and choose ‘Use existing’.

- A pop up with the list of existing workflows appear and you may choose from the list. Once selected, the workflow name, the certificate policy, the users and other attributes like tags and special instructions will auto-populate in the respective fields.
- You will then need to configure signatures.
- You may drop Signature tags on each document for each signer. Signature tags will be available on top of the preview panel depending on the signing policy in the workflow. It will require a signature block per signer in the Workflow, on at least one of the attached documents.
- Alternatively, you may select to turn on ‘Auto-Append’ signatures. Doing so will automatically append signatures to a new page at the end of the document for all signers within the workflow. You will not need to place signature tags if you select to turn on ‘Auto-Append’.

- Fill in the subject field. If left blank, the field will get auto populated with the name of the first document associated with the ePak.
- You may optionally set an expiry date for your ePak. It will not allow you to set the date beyond the Retention period for the ePak. Note: It can now be configured to set expiration and retention dates for an ePak either from the last action date or the ePak’s create date. This is a system level configuration and cannot be controlled by individual users.
- As a custodian and depending on the system configuration, you will have several other settings to choose for your ePak. These are as follows:
- Allow delegation- This feature will allow you to control whether or not an ePak can be delegated further by the signer in the workflow.
- Email Attachment Type- This feature will allow you to control which kind of attachment is sent to all users in the workflow upon ePak completion. Every signing policy will have a default value set against it, but a custodian can override it while composing the ePak. The default value will be configurable on your instance and can be set as desired. Refer to ‘How do I use the Email Attachment Type feature’?
- Archive- In case of Selective LTS on your instance, this feature will allow you to designate whether or not the ePak will be archived after it is completed and reaches its retention date.
- FastWeb View- This feature will allow you designate if you would like app to maintain FastWeb view for your ePak.
- CC users: To send the signed completed document(s) to an email recipient by entering the email address (es) in the CC field.
- Special Instructions: To add special instructions for the recipient (this message will appear in the email notification that is sent to the Recipients). This field allows you enter maximum of 512 characters.
- Smart Tags: To add a Smart Tag (Keyword Tags) in the form of key value pair. It can be configured to provide a list of predetermined smart tags to the Custodian.
- Allow signer attachment: This option will let you control if your signers are allowed to attach supplement documents to the ePak or not.
- Secure Documents: You can now add an extra level of security to your ePaks while sending them out for signatures/review by securing them with a password. The same password will be required by the recipients to access the ePak.
- Once done, you may click on Send and your ePak will be created.
- A success message will appear on your screen.
- Alternatively, to create an ePak with a quick workflow, you may upload the document(s) and manually enter all the workflow details like certificate policy, states and signers and repeat Steps. 13 and 14. Note: If the system is configured so, you will be able to select signing policy for each workflow state in your ePak. By default, the ePak level signing policy will be applicable to all workflow states unless selected otherwise. This will give you more power to get same ePak signed by different signers with the authentication methods apt for each one of them.

If both electronic and digital signing policies have been configured for your instance, you can choose between both for different workflow states however selecting a digital policy for any workflow state will prevent custodian to use an electronic policy for any state after that. Application with throw an error in case user tries to do it:

How do I create an ePak for signature?
MSB gives you an option to create a single ePak or compose multiple ePaks using the ‘Batch Compose’ feature.
To create a single ePak:
1) Click on the Compose tab available in the main navigation bar at the top of the page and choose single or You may also choose the Compose or Quick Compose button on the Dashboard.

2) You can choose to upload a file from Your system, Existing Documents or Document Templates. Once the document is uploaded, you will be navigated to the Manage Documents Page. You may choose to upload multiple files at one time.

3) Upon clicking Next, you will be navigated to Add Recipients screen where you have an option to use an existing Workflow Template. You may add another workflow state to add more signers. You can also select the Signature Policy you would like to use to create an ePak.

Note: When the configuration for a tenant is updated then only the domains listed in this configuration will be visible in user searches on the specified pages like Compose/Workflow state/User Search / Templates / Profile/Out of Office/Signing ePak/Delegate/CC user. If the email of a user excluded from the “IncludeOnly Domain” configuration is known and entered into the search component, the user should be fully accessible without any limitations.
4) Once the Recipients are added, click on Next to drop the Signature Tags on the Document. You may drop Signature tags on each document for each signer. Signature tags will be available on the right side of the preview panel depending on the signing policy in the workflow. MSB requires a signature block per signer in the Workflow, on at least one of the attached documents.
Alternatively, you may select to turn on ‘Auto-Append’ signatures. Doing so will automatically append signatures to a new page at the end of the document for all signers within the workflow. You will not need to place signature tags if you select to turn on ‘Auto-Append’. If configured, Custodians are restricted to place only one signature tag (or any number) per page. This setting can be configured per Signature Policy.
MSB users can drop Radio Buttons as tags on the document while composing an ePak. A radio button can be grouped with others based on the group key. If the Radio button is added or dropped onto the document, it will have the default Group key which is set by the super admin.
Custodians may select an alignment for text tags such as Custodian Text, Custom Text, and Signer Text. Once selected the same alignment should appear while composing and signing the epak, depending on a tag. If the alignment is not selected then the tag should have left alignment by default.
If MSB signer encounters a date reminder tag while composing or signing, users will be able to select a backdate from the date picker provided by the reminder tag. The selected backdate will be filled in the document’s reminder tag and visible on the signed document.

As a custodian and depending on the system configuration, you will have several other settings to choose from for your ePak. Click on the gear icon to view the advanced settings:
-Allow delegation- This feature will allow you to control whether an ePak can be delegated further by the signer in the workflow.
-Email Attachment Type- This feature will allow you to control the type of attachment sent to all users in the workflow upon ePak completion. Every signing policy will have a default value set against it, but a custodian can override it while composing the ePak.
-Archive-In the case of Selective LTS on your instance, this feature will allow you to designate whether the ePak will be archived after it is completed and reaches its retention date.
-FastWeb View- This feature will allow you to designate if you would like an app to maintain FastWeb view for your ePak.
-Smart Tags/Labels: To add a Smart Tag (Keyword Tags) in the form of key value pair. MSB can be configured to provide a list of predetermined smart tags to the Custodian.
-Allow signer attachment: This option will let you control if the signer is allowed to attach supplement documents to the ePak or not.
-Secure Documents: You can add an extra level of security to your ePaks while sending for signatures/review by securing them with a password. The same password will be required by the recipients to access the ePak.

5) Once done, you may click on Send ePak. On the ePak Summary screen, fill in the subject field and add any special instructions for the recipient (if any). To send the signed completed document(s) to an email recipient, enter the email address(es) in the CC field. Custodians may select whether ePak CC recipients receive epak notifications for every action taken on the ePak or only a notification that the ePak has been completed. You may optionally set an expiry date for your ePak. It will not allow you to set the date beyond the Retention period for the ePak.

6) Click on Send and a success message will appear on your screen.
If the system is configured so, you will be able to select a signing policy for each workflow state in your ePak. By default, the ePak level signing policy will be applicable to all workflow states unless selected otherwise. This will give you more power to get the same ePak signed by different signers with the authentication methods apt for each one of them.
If both electronic and digital signing policies have been configured for your instance, you can choose either for different workflow states however selecting a digital policy for any workflow state will prevent custodian to use an electronic policy for any state after that. Application with throw an error in case user tries to do so.

If the auto save toggle is on and the compose process gets halted, ePak will automatically get saved in drafts, ensuring that the work is continuously and securely saved. This option is available in User Profile under User Preferences.

Contact Us
Great, Thank you!
How do I Search for an ePak
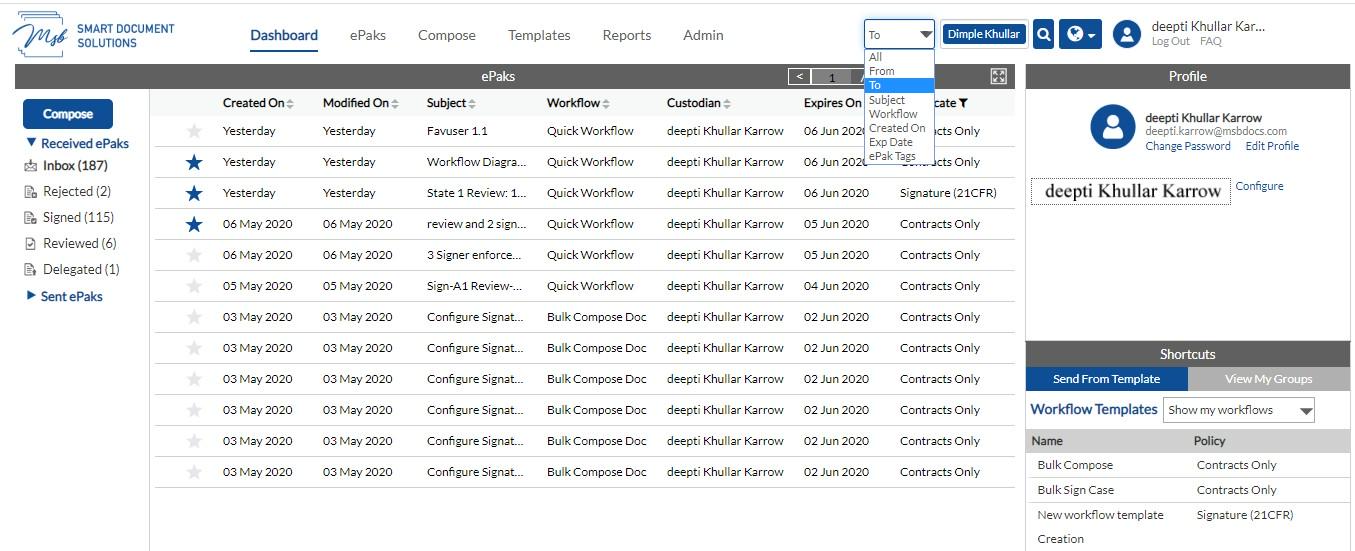
On the main menu bar, you have the search option. You can perform a specific search or can opt for an open search by clicking the “” All” from the drop down, which is set as default. For the specific search you have the option to search by “From” where you can put the sender (custodian) name and click on search to get the results. Similarly, you can search by “To” for the recipient’s name. You can search for a specific “Subject” named ePak. You can search for a specific “workflow” named ePak. You can search for ePaks “Created On” a specific date.
You can search for ePaks with a specific “Expiry Date”. You can also search with “ePak tags” attached to an ePak. The results for all the above searches are displayed in the folder list and Inbox folders is highlighted as default.
How do I Search for an ePak
On the main menu bar, you have the search option. You can perform a specific search or can opt for an open search by clicking the “All” from the drop down, which is set as default. For the specific search you have the option to search by “From” where you can put the custodian’s name and click on search to get the results. Similarly, you can search “To” for the recipient’s name. You can search for a specific Subject, Workflow, Created On, Expiry Date and ePak Labels.

MSB users can also search their ePaks inside the ePak folders to filter ePaks easily based on their status. The search functionality will allow the user to input free text in the search box. The search will be specific to the selected folder, either “Received” or “Sent”, and its subfolders. The user may select any filter (All, From, To, Subject, Workflow, Created On, Expiry Date and Labels) to search for ePaks. The user will be able to select the main folder (Received or Sent) to initiate a search for ePaks and all the subfolders within the selected main folder will be visible to the user. The user may apply one or more filters to refine their search for ePaks within the selected folder or subfolder.
Users can perform ePak searches within their inbox folders based on labels. After receiving an ePak in their inbox, signers will be able to filter ePaks based on the key or value of the labels or use a combination of keys and values.


Contact Us
Great, Thank you!
Can I upload documents from my OneDrive and get them signed directly?
Yes, you can now save yourself the hassle of switching screens by accessing documents in your OneDrive and prepare them for signature right from your account. All the completed documents will then be stored back in your OneDrive account for easy access.
If OneDrive has been enabled for your instance, as a custodian you will have an option to upload a document from OneDrive. Your OneDrive account must have at least one document. To create an ePak using OneDrive:
- On the Compose page, click on attach button and in the pop up – select one drive from the drop down.
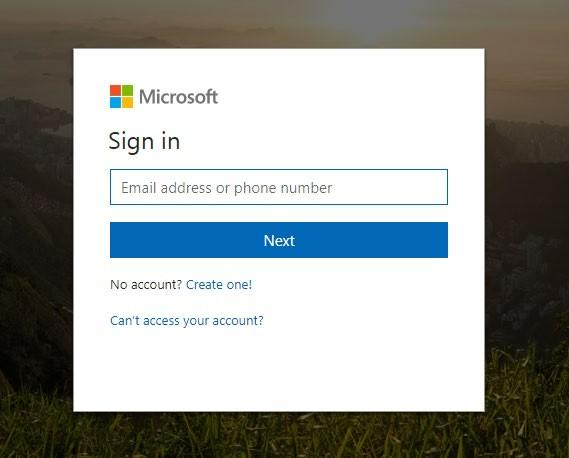
- You will be redirected to OneDrive Authentication page to enter details and log into your OneDrive account.
- Upon a successful login, you will be able to select a document from the available list and upload it to your account. Compose screen to be sent out for signature/review.
- Once the ePak completes its workflow, a new version of the same document will automatically be added to your OneDrive account with timestamp and signed as status of the document mentioned in the document name.
Can I upload documents from my OneDrive and get them signed directly?
Yes, you can now save yourself the hassle of switching screens by accessing documents in your OneDrive and prepare them for signature right from your account. All the completed documents will then be stored back in your OneDrive account for easy access.
If OneDrive has been enabled for your instance, as a custodian you will have an option to upload a document from OneDrive. Your OneDrive account must have at least one document. Follow the below steps to create an ePak using OneDrive:
1) When you click on the Compose button, you will see an option to select one drive.
2) You will be redirected to the OneDrive Authentication page to enter details and log into your OneDrive account.

3) Upon a successful login, you will be able to select a document from the available list and upload it to your account. Compose screen to be sent out for signature/review.
4) Once the ePak completes its workflow, a new version of the same document will automatically be added to your OneDrive account with timestamp and signed as status of the document mentioned in the document name.