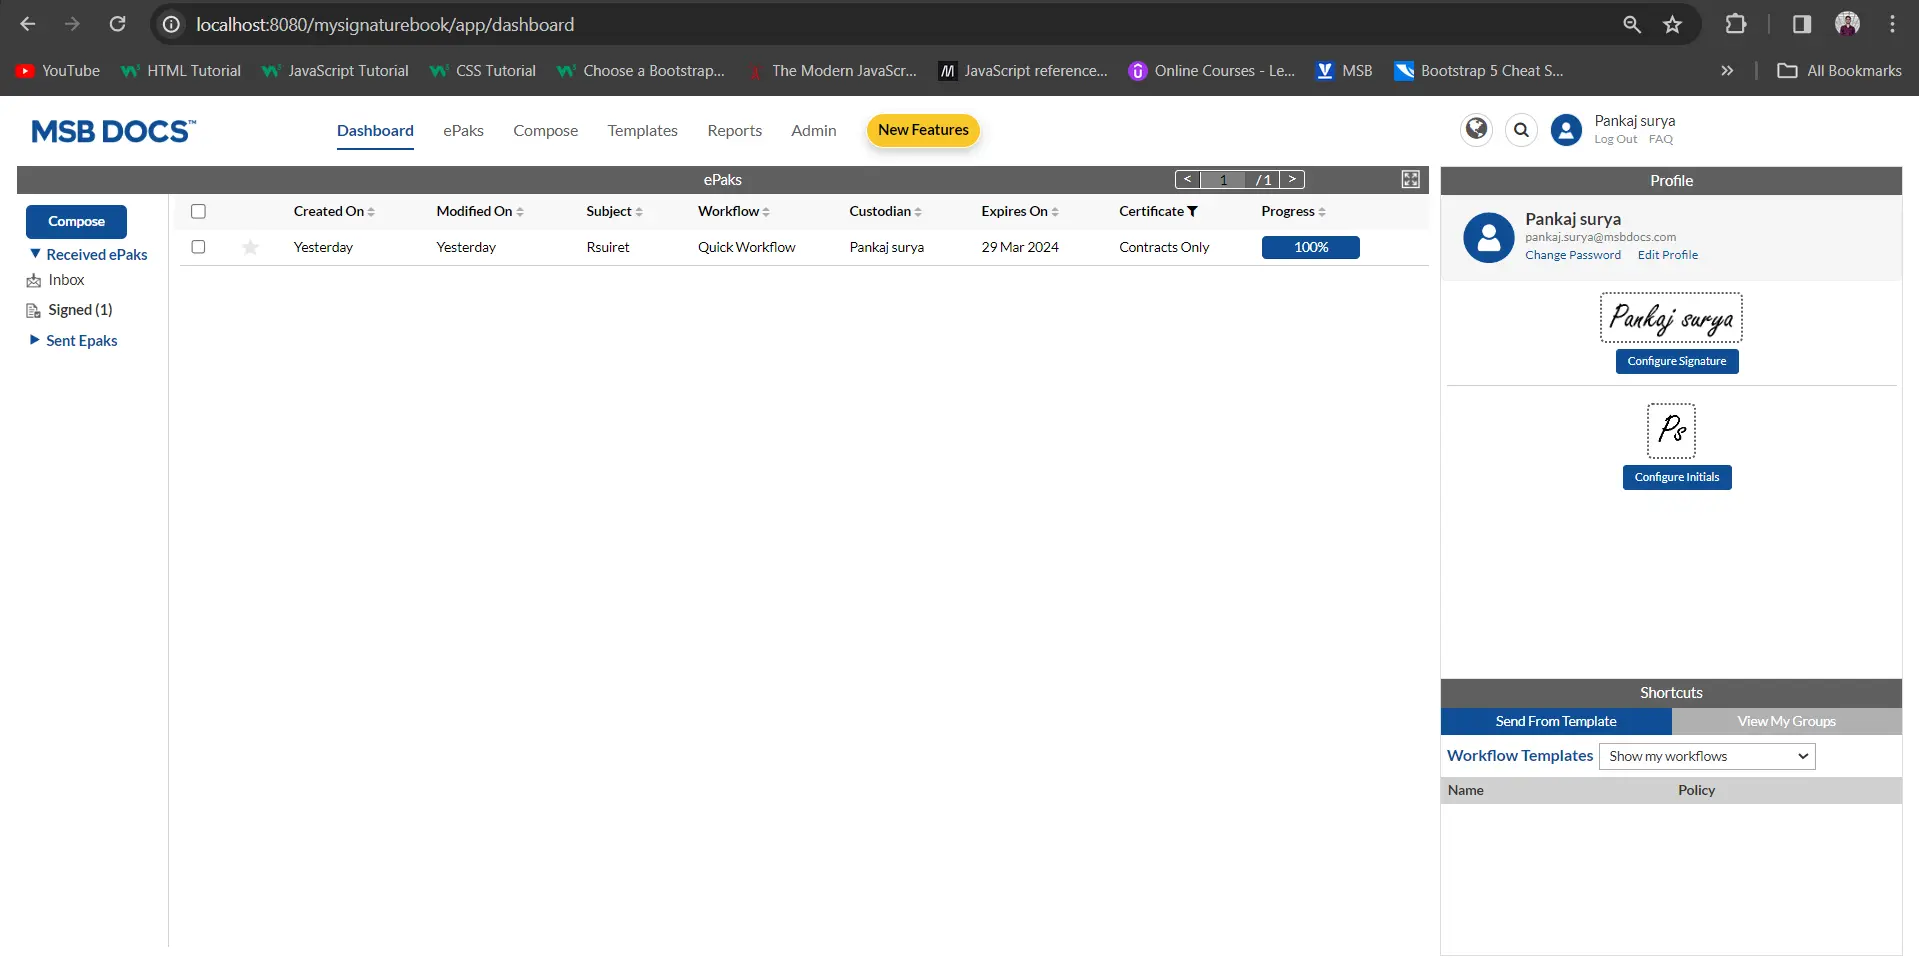
How do I access reports of ePaks as an Admin
Click the Reports link in the navigation bar and select ‘Administrative Reports’. A list of ePak reports will be displayed. Select the desired report, enter a start date, and end date, select the user, and click the Download button to download the report data.
The reports available to Admin users are:
– All ePaks – Master ePak Report
– User Velocity – Selected user’s ePak completion time (Completed ePaks only)
– User List – List of users in the system and their status
– User Volume – All users count with Role
– User Activities – Selected users ePak activity details
– Epak Volume – Count of ePaks created
– ePak Signature Volume – Count of ePaks created for signatures
– Signers ePak Volume – Count of ePaks sent to all signers
– ePak Status Volume – Count of all ePaks for selected/all users
– tenant config – Tenant Configuration Report
– Signature Count Summary – Signature Count Summary
– Signature Count Detail – Signature Count Detail
How do I access reports of ePaks as an Admin
Click the Reports link in the navigation bar and select ‘Administrative Reports’. A list of ePak reports will be displayed. Select the desired report, enter a start date, and end date, select the user, and click the Download button to download the report data.
The reports available to Admin users are:
-All ePaks – Master ePak Report
– User Velocity – Selected user’s ePak completion time (Completed ePaks only)
– User List – List of users in the system and their status
– User Volume – All users count with Role
– User Activities – Selected users ePak activity details
– Epak Volume – Count of ePaks created
– ePak Signature Volume – Count of ePaks created for signatures
– Signers ePak Volume – Count of ePaks sent to all signers
– ePak Status Volume – Count of all ePaks for selected/all users
– tenant config – Tenant Configuration Report
– Signature Count Summary – Signature Count Summary
– Signature Count Detail – Signature Count Detail

Contact Us
Great, Thank you!
Zoom-in and Zoom-out
You may use the zoom-in and zoom-out feature on a document before signing by using the zoom tools in the document toolbar. This allows you to enlarge the document for better viewing. As soon as you click on the Start button to begin the signing process the document view will be changed back to the original size.
MSB users can zoom in/zoom out documents for preview on Compose and signing screen. If this feature is configured, user can perform zoom actions by pinching in and pinching out on both the compose and signing screens and do the same with the provided buttons.
Contact Us
Great, Thank you!
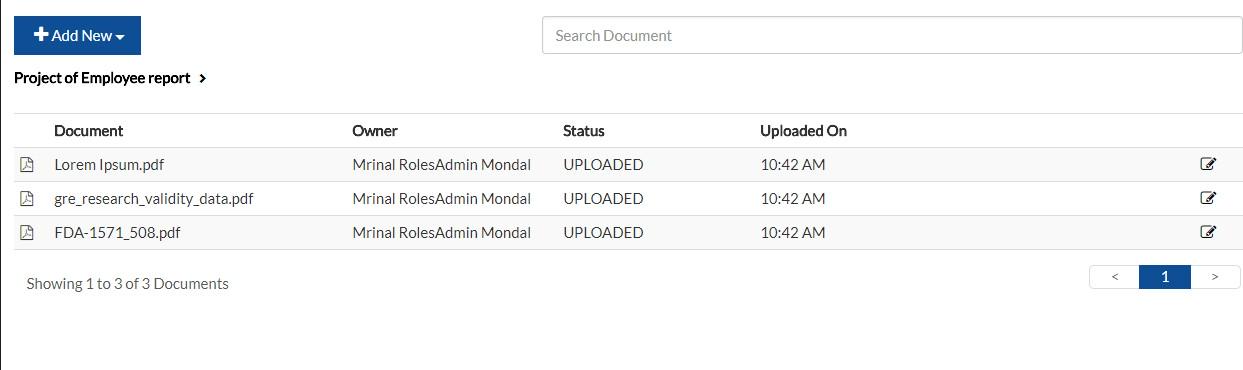
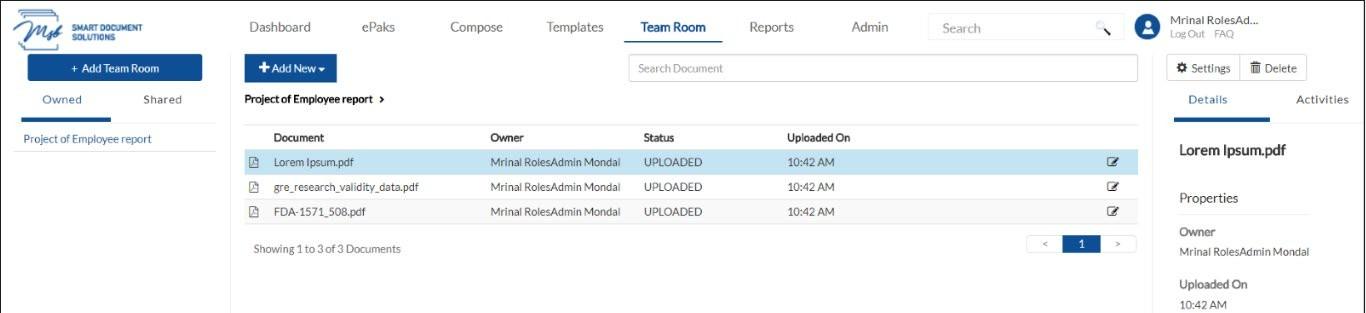
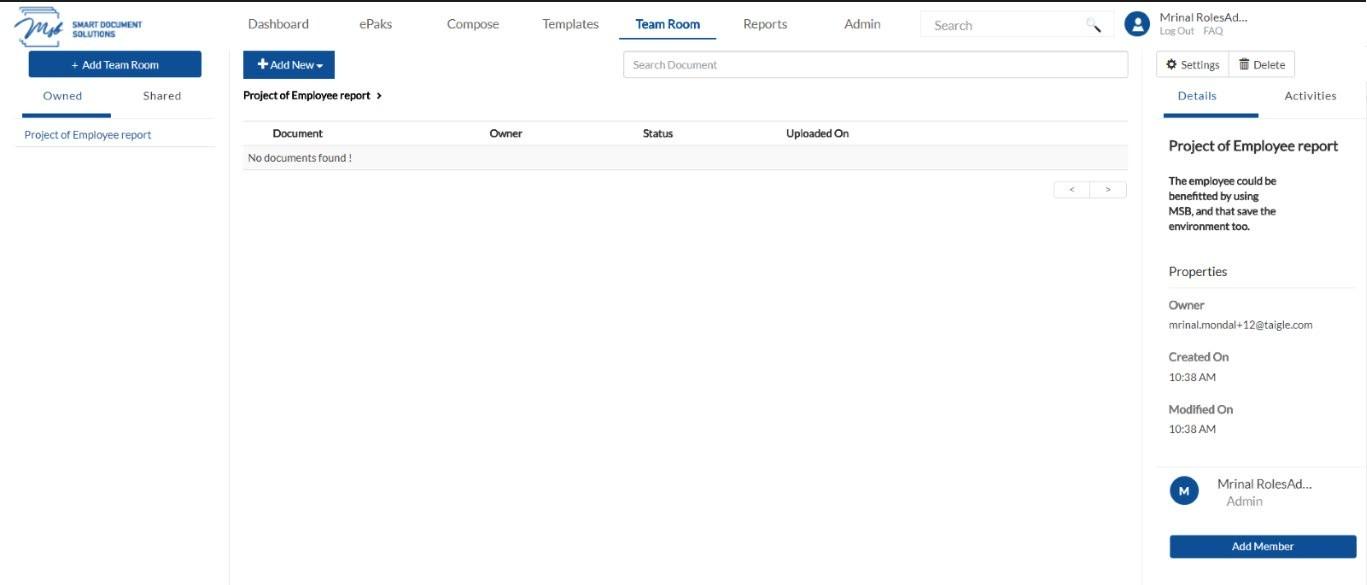
How do I add documents to the Team Room?
You can upload documents to the team room to share them with others.
- To upload documents to your team room, access the ‘Add New’ button on the top of the center panel (Document Panel).
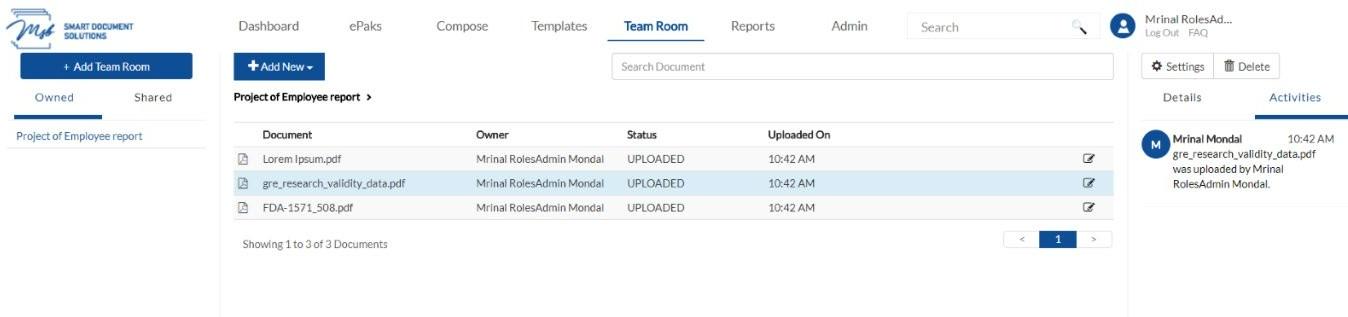
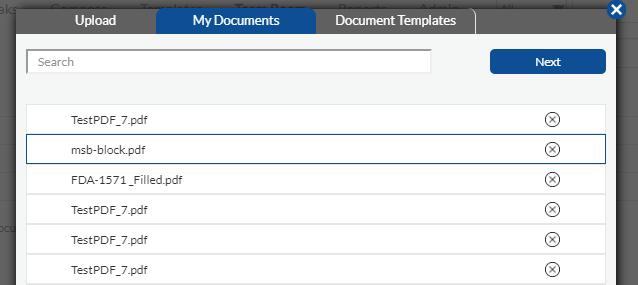
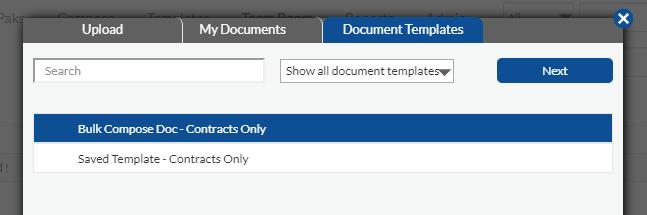
- You will have the option to upload a document from your device (Upload), your drafts (My Documents), and your document templates (Documents Templates) from here. To choose from available documents in your system, click ‘upload a document’ and navigate to the location for the file, select it and click the Open button. You may choose to upload multiple files at one time.
Documents in any of the following file formats can be uploaded unless the system has been configured differently on client request:
- Microsoft® Word® 2003, 2007, 2010, 2013
- Microsoft Excel® 2003, 2007, 2010, 2013
- Microsoft PowerPoint® 2003, 2007, 2010, 2013
- Image file formats (.png, .jpg, .gif and .tif)
- Portable Document Format (.pdf) files
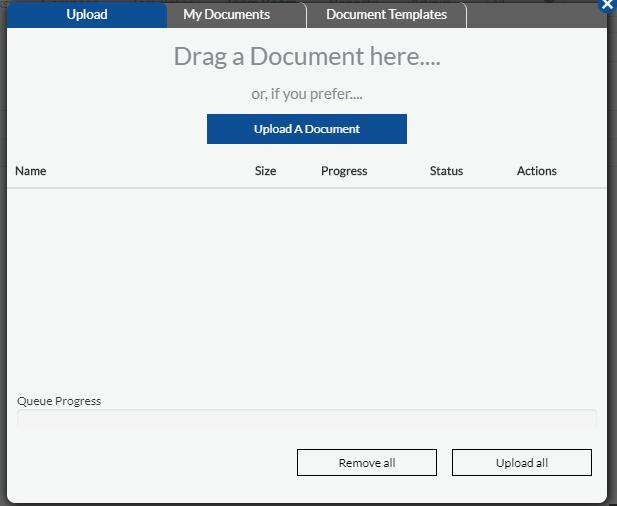
- Then click on ‘Upload all’ to upload the documents to the team room. These documents will then be shared with all the other members of the room and will be available for further actions.
- Similarly, if you click on My document, it will show you the list of all documents in your drafts. Clicking on a draft will bring the document from drafts to Team Room and that document will be not present in the draft folder anymore.
- Clicking on Document Templates will show you a list of all document templates accessible to you, choosing a template and clicking next will bring the copy of the document for use in team room.
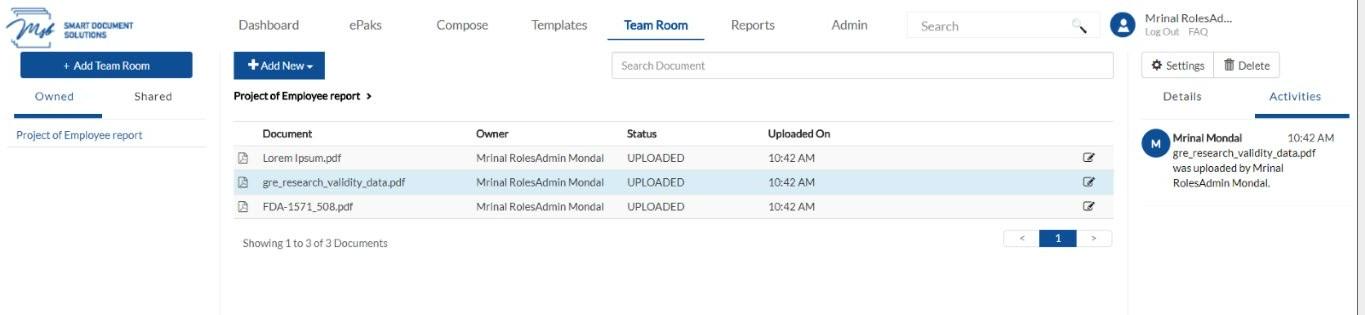
- You may click on a document (selected document is highlighted in blue) to view the details and all activities performed on it in the panel on the right. All actions will be tracked, and a complete audit trail will be maintained under Activities Tab in that panel.
How do I add documents to the Team Room?
To upload documents to your team room, access the ‘Add Document’ button.
You will have the option to upload a document from your device, Existing Documents, and document templates. You may choose to upload multiple files at one time. The uploaded documents will then be shared with all the other members of the room and will be available for further actions.
A Team Room member with the Team Room role of Submitter may add documents to the team room from templates, and compose an epak from documents in the team room. All actions will be tracked, and a complete audit trail will be maintained under Activities Tab in that panel.

You will have the option to upload a document from your device (Upload), your drafts (Existing Documents), and Document Templates from here. To choose from available documents in your system, click ‘upload a document’ and navigate to the location for the file, select it and click the Open button. You may choose to upload multiple files at one time.

Similarly, if you click on Existing document, it will show you the list of all documents in your drafts. Clicking on a draft will bring the document from drafts to Team Room and that document will be not present in the draft folder anymore.
Clicking on Document Templates will show you a list of all document templates accessible to you, choosing a template and clicking next will bring the copy of the document for use in team room.
Contact Us
Great, Thank you!
What are the various actions allowed on Team Room Documents?
Basis your role in the Team Room, you will have access to several action items for each document. Click the action icon against the preferred document to see the available options.
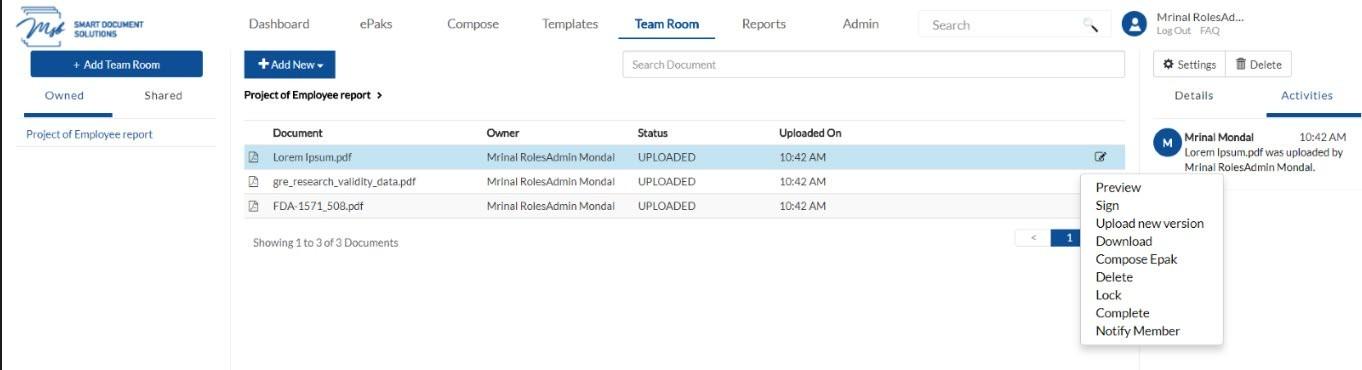
Preview
This option will appear only for PDF files and will allow you to view the content of the document. Non PDF documents cannot be previewed in Team Room.
Sign
You can self-sign a document in the team room whenever you are ready. Right click on the document, click sign to be redirected to the sign page with tags specific to the team room’s default signing policy. Drag the tag onto the location and click it to fulfill. Depending on the signing policy, you will be prompted to authorize the signing. With every signing activity, a new version of the same document will get uploaded in the Team Room. For Non PDF documents, the new version of the document after signing will be a PDF by default.
Upload New Version
This option allows you to upload a new/updated version of the same document, irrespective of the original owner. Document versioning will be done to manage multiple versions of the same document.
Download
If your role allows, you will be able to use this option to download the shared document to your system. You may choose to then save it for long term archival or make changes as necessary and upload the new version back to the team room.
Compose ePak
Apart from a signer, all other roles will be able to use Team Room documents to compose an ePak and request signature/review.
Delete
Delete will allow a user to remove the document from the Team Room. The fact that all actions in the team room are recorded at each step provides transparency and accountability.
Lock/Unlock
This allows a Team Room participant to lock a document and the document becomes temporarily unavailable for any further editing unless the user unlocks it. A locked document will display a ‘Lock’ icon next to it.
Complete
A document can be marked complete by a user if it is considered final and the document will be frozen preventing any further actions on it. This action cannot be undone, and a completed document will thereafter be available only for preview or download.
Notify Member
You can choose to send signature request reminder to one or all the members of the team room by using this option. This will send a real-time email notification requesting user(s) to sign the document.
What are the various actions allowed on Team Room Documents?
Basis your role in the Team Room, you will have access to several action items for each document. Click the action icon against the preferred document to see the available options.

Preview
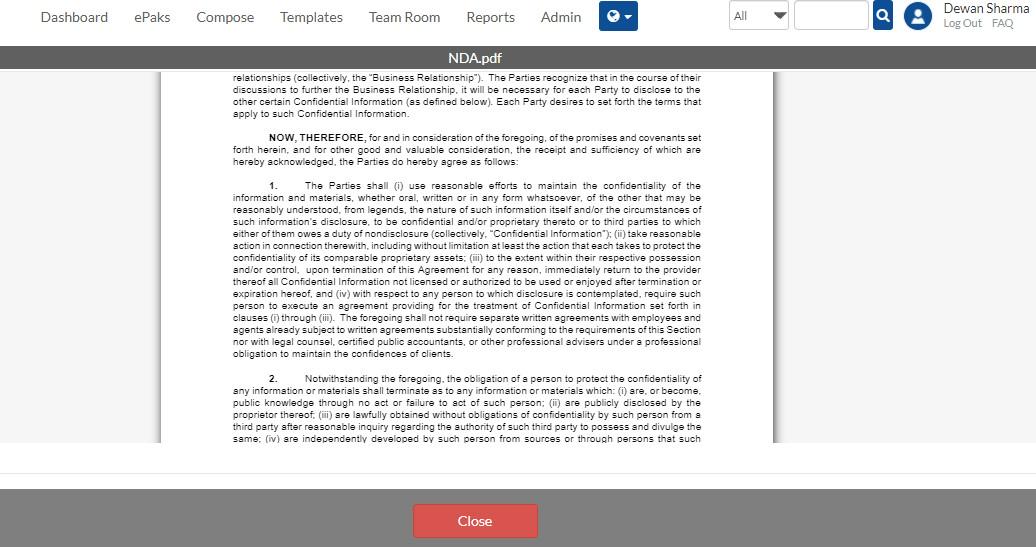
A user accesses a document within a Team Room and chooses to preview it. The system displays the document directly in the web browser (within MSB). During the preview, no document tags or tools are available; only a Close button is provided. After viewing the document, the user clicks the Close button to exit the preview mode. The system then returns the user to the document list view.
Sign
You can self-sign a document in the team room whenever you are ready. Right click on the document, click sign to be redirected to the sign page with tags specific to the team room’s default signing policy. Drag the tag onto the location and click it to fulfil. Depending on the signing policy, you will be prompted to authorize the signing. With every signing activity, a new version of the same document will get uploaded in the Team Room.
Upload New Version
This option allows you to upload a new/updated version of the same document, irrespective of the original owner. Document versioning will be done to manage multiple versions of the same document.
Download
If your role allows, you will be able to use this option to download the shared document to your system. You may choose to then save it for long term archival or make changes as necessary and upload the new version back to the team room.
Compose ePak
Apart from a signer, all other roles will be able to use Team Room documents to compose an ePak and request signature/review.
Delete
Delete will allow a user to remove the document from the Team Room. The fact that all actions in the team room are recorded at each step provides transparency and accountability.
Lock/Unlock
This allows a Team Room participant to lock a document and the document becomes temporarily unavailable for any further editing unless the user unlocks it. A locked document will display a ‘Lock’ icon next to it.
Complete
A document can be marked complete by a user if it is considered final and the document will be frozen preventing any further actions on it. This action cannot be undone, and a completed document will thereafter be available only for preview or download.
Notify Member
When a user in a Team Room selects to notify members about a document, they have the option to either specify a single member or choose to notify all members. This will send a real-time email notification requesting user(s) to sign the document.
Assign Labels
In a Team Room, users can add new labels by entering a label name and optionally nesting it under existing labels. Labels without nesting appear as top-level folders in the Team Room structure, while nested labels appear under designated parent labels. Users can assign documents to labels from the document view, and each document can be assigned multiple labels. Removing a label from a document removes the document from that label’s view, and removing all labels returns the document to the root of the Team Room structure. User may also edit/delete/Manage access of the label.
View Activities
When a user enters a Team Room and views activities, the system presents all activities that have occurred within that Team Room. If the user selects a specific document within the Team Room and views activities for that document, the system displays a summary of activities related specifically to that document.
In-Person Sign
When a user selects a document for in-person signing, the system prompts them to enter required signer details such as email, first name, and last name. After submitting this information, the user can drag and drop tags onto the document for the in-person signer. The signer then checks a consent box, interacts with the tag to either draw their signature or fill out the tag’s contents, and subsequently signs the document. Throughout this process, all actions, including the initial selection, tag placement, consent checkbox activation, and signing activity, are recorded in the document activities log.
Contact Us
Great, Thank you!
Team room documents to have a hyperlink to preview:
In a team room, a user can now preview the document by the hyperlink on the document listing.
Contact Us
Great, Thank you!
Can I access a previous version of a document which has been replaced by a new version?
Yes, you can access the previously uploaded documents under the activity tab of the team room. Here you will find the hyperlinks to each document which was uploaded with activity details. Clicking on the hyper link will
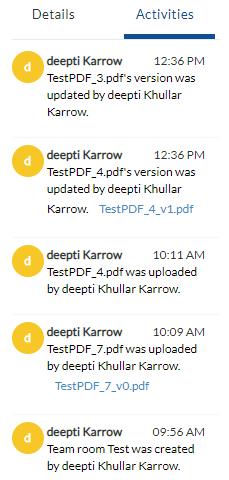
download the document for your preview.
Can I access a previous version of a document which has been replaced by a new version?
Yes, you can access the previously uploaded documents under the activity tab of the team room. Here you will find the hyperlinks to each document which was uploaded with activity details. Clicking on the hyper link will download the document for your preview.
Contact Us
Great, Thank you!
Enhanced document security in Teamroom
Team Room has been enhanced to prevent users from printing and saving document previews. Users are prevented from using their web browser from printing document previews. Users are also prevented from right clicking and Saving as Image on document image previews. Users may still download and print the downloaded documents.
Users will not be able to right click on Teamroom document in order to save it as image or in other format.
In case user tries to print the document by Ctrl + P, then it will show a blank page over printing preview (refer below snippet):
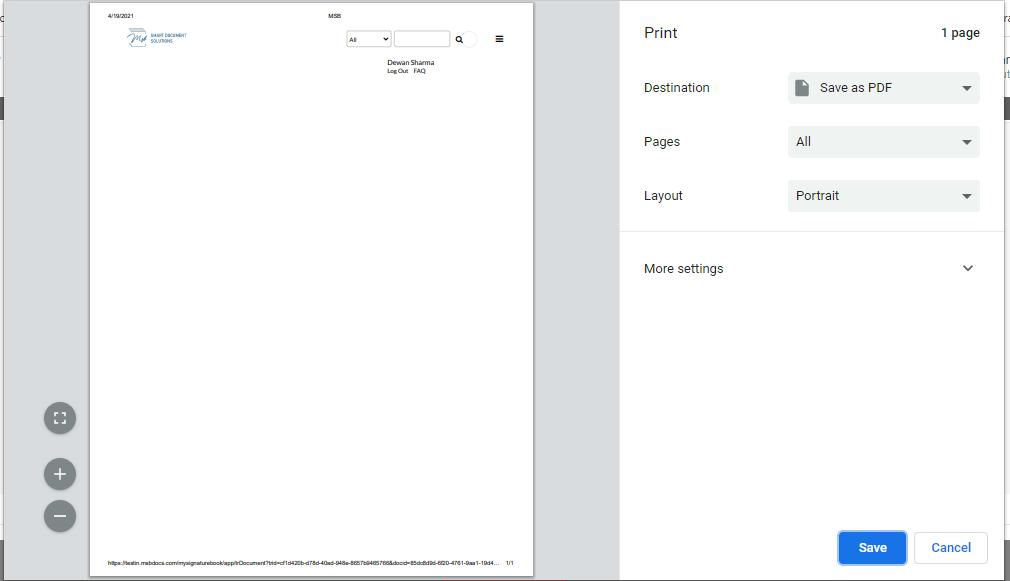
Enhanced document security in Teamroom
Team Room has been enhanced to prevent users from printing and saving document previews. Users are prevented from using their web browser from printing document previews.
Users are also prevented from right clicking and Saving as Image on document image previews. Users may still download and print the downloaded documents. In case user tries to print the document by Ctrl + P, then MSB will show a blank page over printing preview.
Contact Us
Great, Thank you!
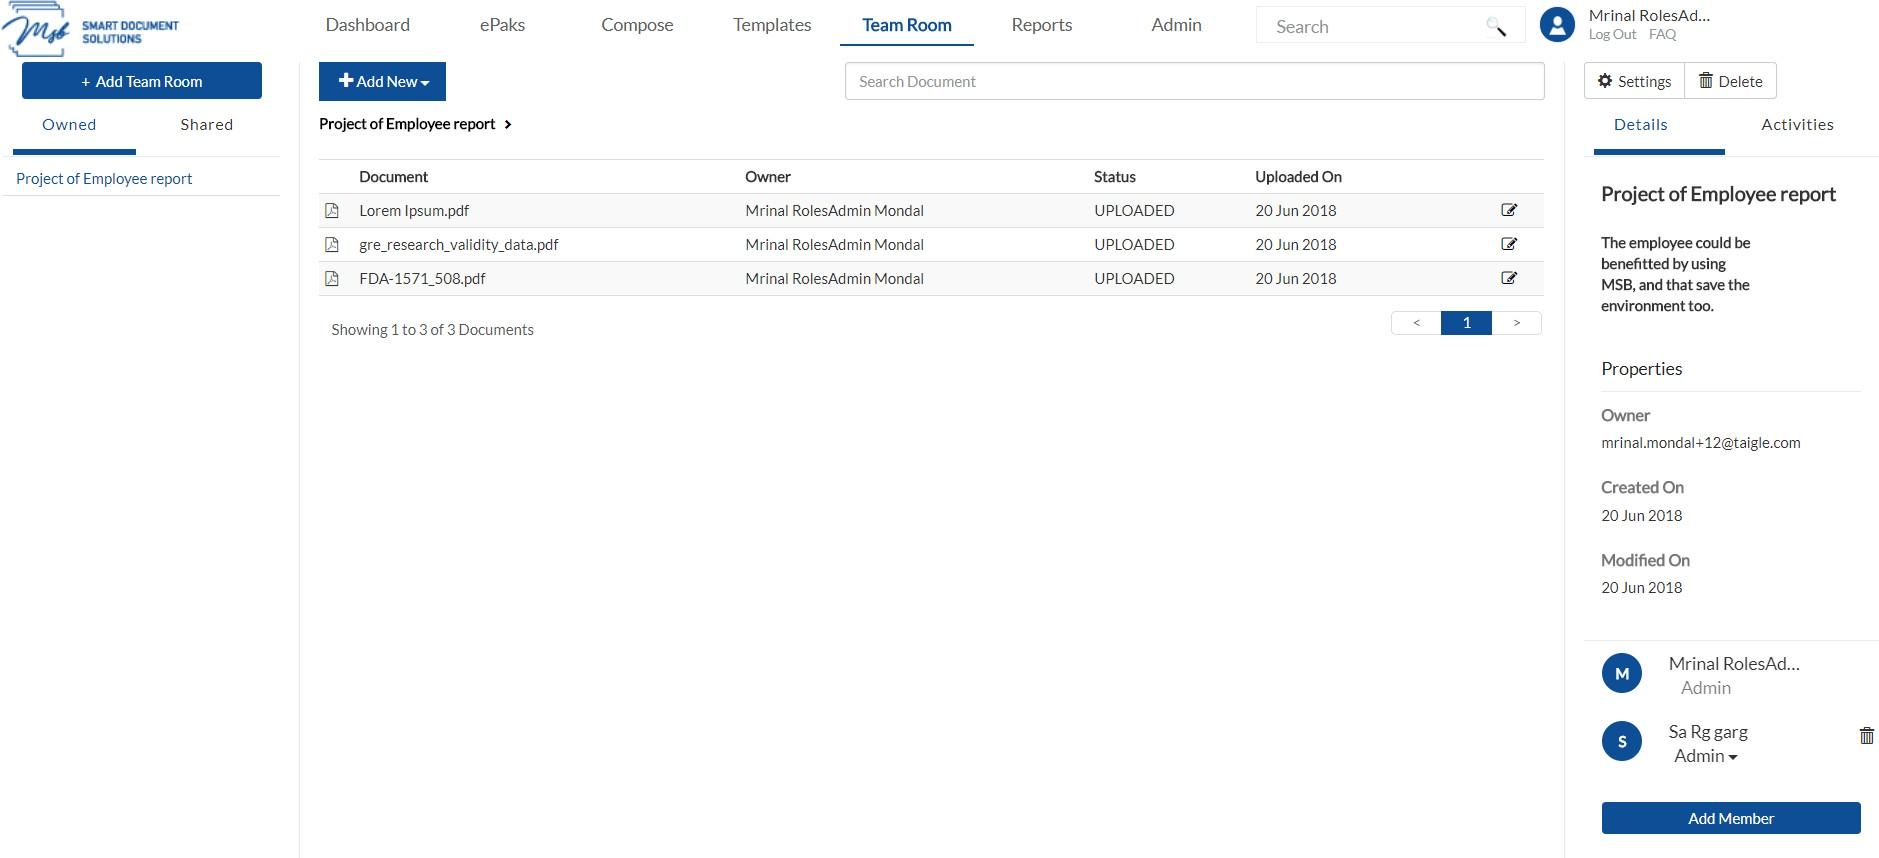
How do I add users to my Team Room?
You can select the people to add to your team room
- Once you’re into the team room, click the ‘Add Member’ button on the bottom right corner of the screen.
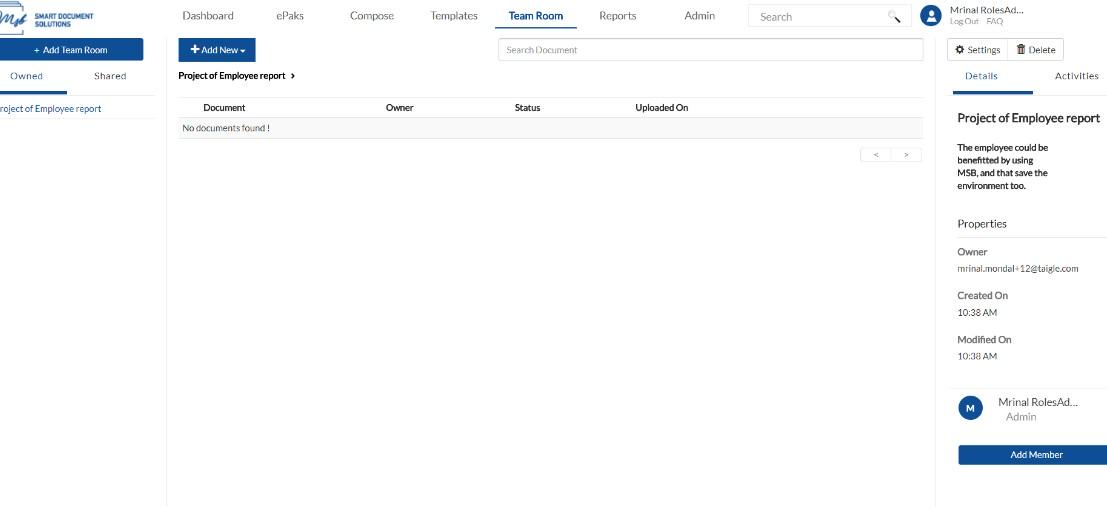
- In the dialogue box that pops up begin typing in the field to add user. As you type, it will show you list of suggested names, and you may select from it. You can only add from existing users.
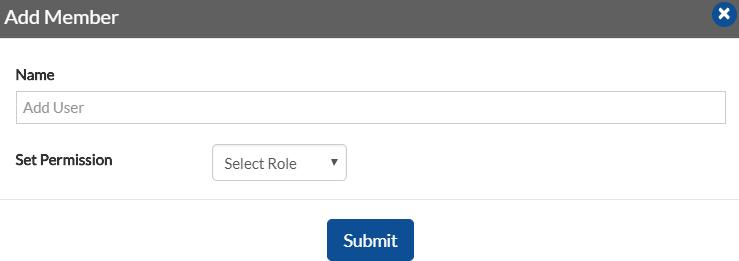
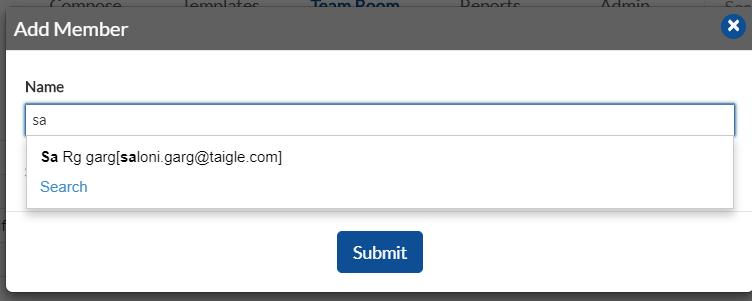
- Select a user >> Choose a role (Admin, Editor, Submitter or Signer) and click submit.
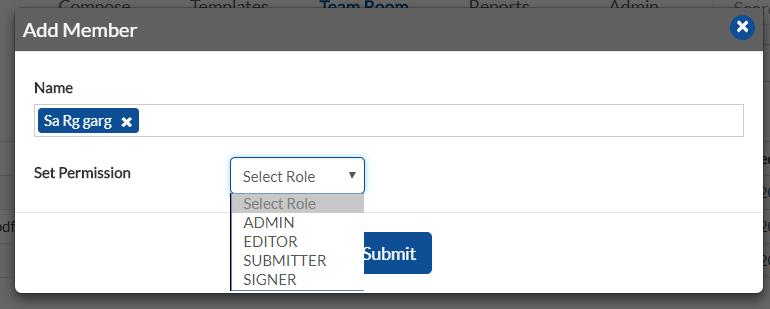
- It will display a confirmation and the user will added to team room and will show in the right panel.
- NOTE: A user with the role of Signer or Submitter can be assigned the same roles in Team Room respectively.
How do I add users to my Team Room?
Once you are in the team room, click the ‘Add Members’ button.

In the dialog box, select the user role from the dropdown and start typing in the user field to add names. As you type, a list of suggested names will appear, and you can select from these suggestions. You can only add users who already exist in the system. A confirmation message is displayed on adding a new member successfully.


To update a members role in the team room, click the drop-down menu against the user’s current role and select from other options. The change will be auto saved, and a confirmation will be displayed.
NOTE: A user with the role of Signer or Submitter can be assigned the same roles in Team Room respectively.
Contact Us
Great, Thank you!
Can I delete a user from my Team Room?
Yes, to remove a user from the team room, click the delete icon against the user’s name in the panel on the right.
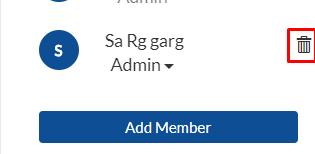
Can I delete a user from my Team Room?
To remove a user from the team room, click the delete icon against the user’s name in the panel on the right.

Contact Us
Great, Thank you!
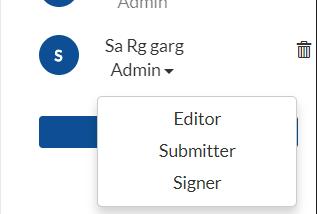
How do I update a user’s role in the Team Room?
To update a user’s role in the team room, click the drop-down menu against the user’s current role and select from other options. The change will be auto saved, and a confirmation will be displayed.
How do I update a user’s role in the Team Room?
To update a user’s role in the team room, click the drop-down menu against the user’s current role and select from other options. The change will be auto saved, and a confirmation will be displayed.


Contact Us
Great, Thank you!
How to delete a Team Room?
An owner or admin of a Team Room can select the Team Room they wish to delete. Click the Delete icon in the right panel to remove it from your list of owned/shared Team Rooms.

How to delete a Team Room?
An owner or admin of a Team Room can select the Team Room they wish to delete. Click the Delete icon in the Team room Page or Team Room details page to remove it from your list of owned/shared Team Rooms. System moves the Team Room into the Bin.


If a Team Room is found in the deleted Bin, the owner/admin can:

Contact Us
Great, Thank you!
How to Clone a Team Room?
Team Room owner/Admin of the team room can clone the team room by clicking on the three dots parallel to the team room on the left pane and then click on the clone option.
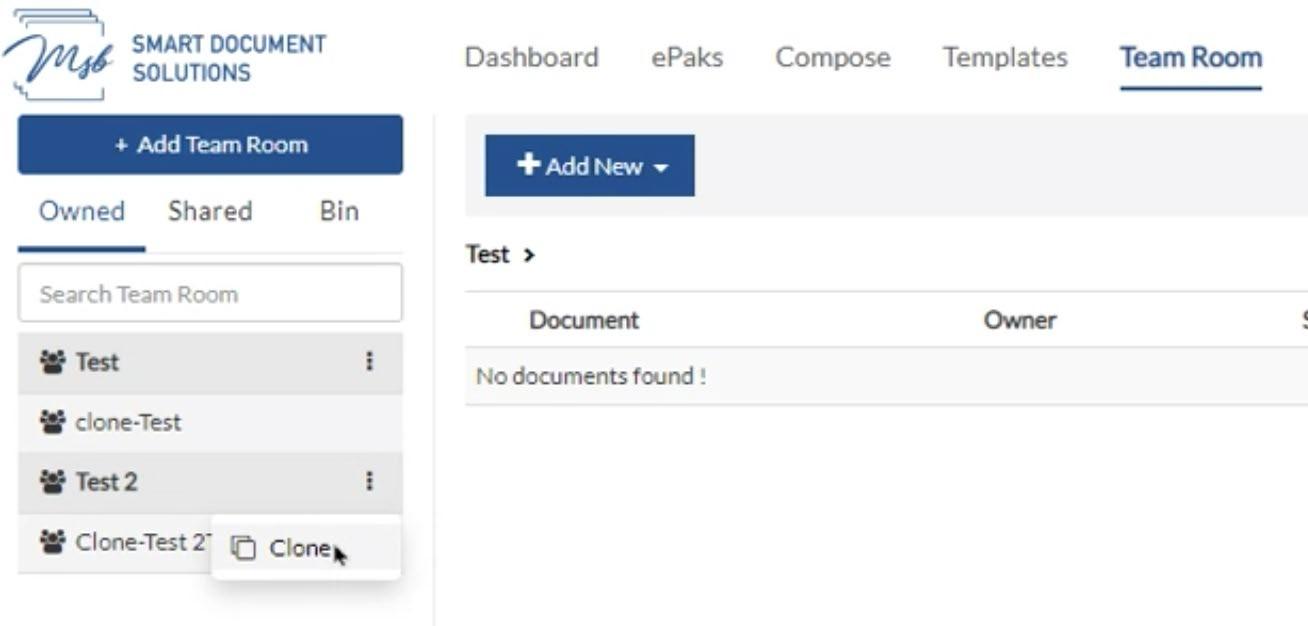
User will get an option to enter the Team Room name and the option to Notify the other users of the team room.
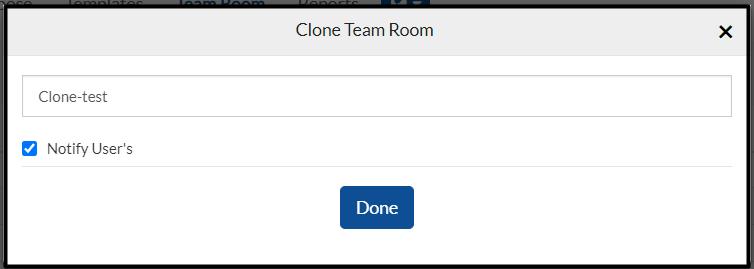
Once user clicks on done, a new team room will be created with the given name and will have the same settings as the original team room.
How to Clone a Team Room?
Team Room owner/Admin of the team room can clone the team room by clicking on the gear icon on the Team room Page or Team Room details page and then click on the clone option. User will get an option to enter the Team Room name and the option to Notify the other users of the team room.


Once user clicks on done, a new team room will be created with the given name and will have the same settings, users and permissions as the original team room. Documents are not cloned into new team room.
Contact Us
Great, Thank you!
Can a group have multiple managers with the same privilege?
An admin can assign multiple group managers. All assigned managers will have the same privileges. To be manager I must have Custodian and above role. Every manager is also a member of the group, once removed from group as manager the user will be removed from the group as member also.
Contact Us
Great, Thank you!
What is a Team Room?
Team Room is a team-based feature designed to facilitate a group of users to plan, track, and collaborate in a central, consolidated view. It allows multiple users (according to their role) of a team/department to come together in real time or work offline to draft, view, share and sign documents. It speeds up the process and makes it easier for everyone.
If your instance has been setup to support this feature, you will be able to see it in the main navigation bar at the top of the web interface.

What is a Team Room?
Team Room is a collaborative feature tailored for teams to efficiently plan, track, and work together on documents. It enables users with different roles within a team or department to gather in one place, whether online in real-time or offline, to create, view, share, and sign documents. This enhances productivity by streamlining processes and providing a centralized workspace accessible from the main navigation bar of the web interface, if enabled for your instance.

Contact Us
Great, Thank you!
What are the different roles in a Team Room?
The role assigned to users while adding them to the team room determines what actions they can perform and decides the visibility and access that users have into other Users’ documents.
The four types of roles in Team Room are Administrator, Editor, Submitter and Signer.
Administrator (Admin)
An Administrator (Admin) is a user who has the ability to perform administrative tasks such as add/remove members, assign roles, and modify team room settings. By default, the creator of the team room will be the administrator however he may choose to assign this role to another member(s) in the team room. A Team Room can have multiple administrators.
Note: To be an administrator in the Team Room a user must have role of that of a custodian or above. Team Room Administrators can:
- Add/Remove members
- Edit user roles
- Check in/check out documents for offline editing
- Manually complete a document
- Self-sign document(s) in the team room
- Lock/freeze a document (Document will be no longer available for further actions then)
- Unlock a document and make it available to others again
- Create ePak from Team Room documents
- Delete documents (soft delete) from team room
- Send signature request reminder to one or all in the team room
- Fill up any acrofield(s) in PDF
- Based on policy, place allowed tags in a single go e.g., place and sign in the same step
- Modify Team Room settings like Team Room Name, Allowed Policy etc.
Team Room Editors can:
- Check in/check out documents for offline editing
- Self-sign document(s) in the team room
- Lock/freeze a document (Document will be no longer available for further actions then)
- Unlock a document and make it available to others again
- Create ePak from Team Room documents
- Delete documents (soft delete) from team room
- Send signature request reminder to one or all in the team room
- Fill up any acrofield(s) in PDF
- Based on policy, place allowed tags in a single go e.g., place and sign in the same step
Submitters can:
- Create ePak from Team Room documents
- Self-sign document(s) in the team room
- Send signature request reminder to one or all in the team room
Signers can:
- Self-sign document(s) in the team room
- Send signature request reminder to one or all in the team room
NOTE: All email notifications will be sent only to the Team Room owner and the user performing the specific action that triggered the email.
Contact Us
Great, Thank you!
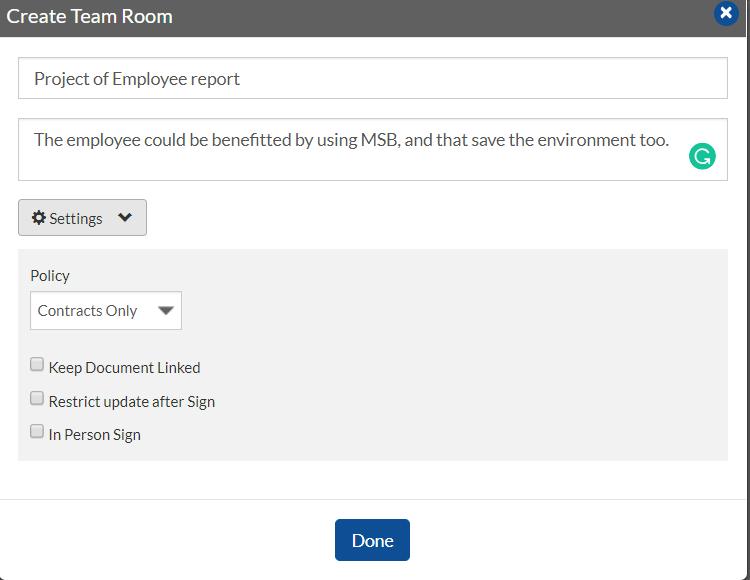
How do I create a Team Room?
If your account role is that of a custodian or above, you will be able to create a Team Room:
- Go to Team Room Tab in the main navigation bar.

- Click Add Team Room button.
- Enter Name, description and define other settings for Team Room. Click on Settings to expand and select from available options. Refer to Team Room settings to read more.
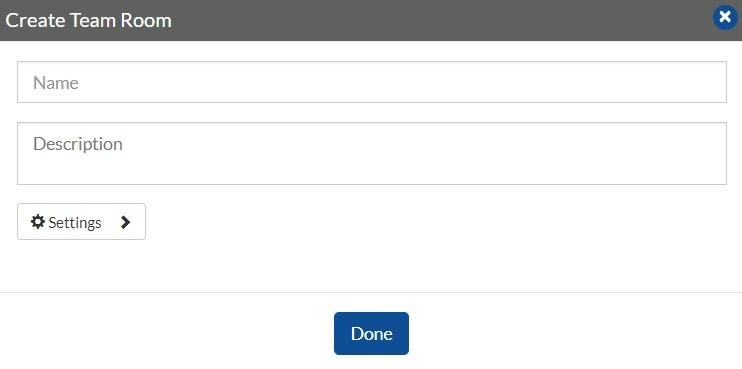
- Click ‘Done’ to confirm Team Room creation and it will display a confirmation.
The newly created Team Room will now be available on the left under ‘Owned’. If there are any other Team rooms that you are part of but don’t own, they will be displayed under ‘Shared’. You can switch between the tabs (Owned & Shared).
On the right, will be all the details of the Team Room, including the members of the room. All the activities within the team room will also be tracked and a complete audit trail will be maintained under Activities Tab on the right.
How do I create a Team Room?
If your account role is that of a custodian or above, you will be able to create a Team Room. Go to Team Room Tab in the main navigation bar and click Create New button

Enter Name, description, select the Signature Policy and define other settings for Team Room. Click Create to confirm Team Room creation.

The newly created Team Room will now be available under ‘Owned’. If there are any other Team rooms that you are part of but don’t own will be displayed under ‘Shared’. Select the Team Room to view all the details of the Team Room, including the members of the room. All the activities within the team room will also be tracked and a complete audit trail will be maintained under Activities Tab on the right.

Contact Us
Great, Thank you!
What are the different settings allowed for a Team Room?
While creating a Team Room, you can select the most appropriate settings as per your requirement. The allowed settings are as follows:
Keep Document Linked
This setting would allow you (as a Team Room owner) to control and track the team room’s document(s) when used for creating ePaks within the team room. If checked, this feature would keep a track of a document when sent for signatures and automatically upload the new version in the team room when the document (ePak) gets completed.
Mark Document Complete
If the above option (Keep Document Linked) is checked, then as a team room owner you can also choose to mark the document complete in team room when the ePak created with the specific document gets completed. The status of the document is then set to complete too.
Restrict Update after Sign
This setting, if checked will restrict a user from an uploading a new version of a document or delete it after is has been signed once. This covers both- a self-signed document in team room and sign via ePak creation.
Contact Us
Great, Thank you!
What is my responsibility as a Group Manager?
As a Group manager you can:
- View all groups that you are manager of
- View ‘My groups’ statistics
- View ‘My groups’ ePaks
- View individual group member’s ePaks
- View ePak details for a group member (like documents within an ePak, viewing signatures and audit trail)
- Change signer on a group member’s ePaks
- Reassign a group member’s ePak to another custodian
Contact Us
Great, Thank you!
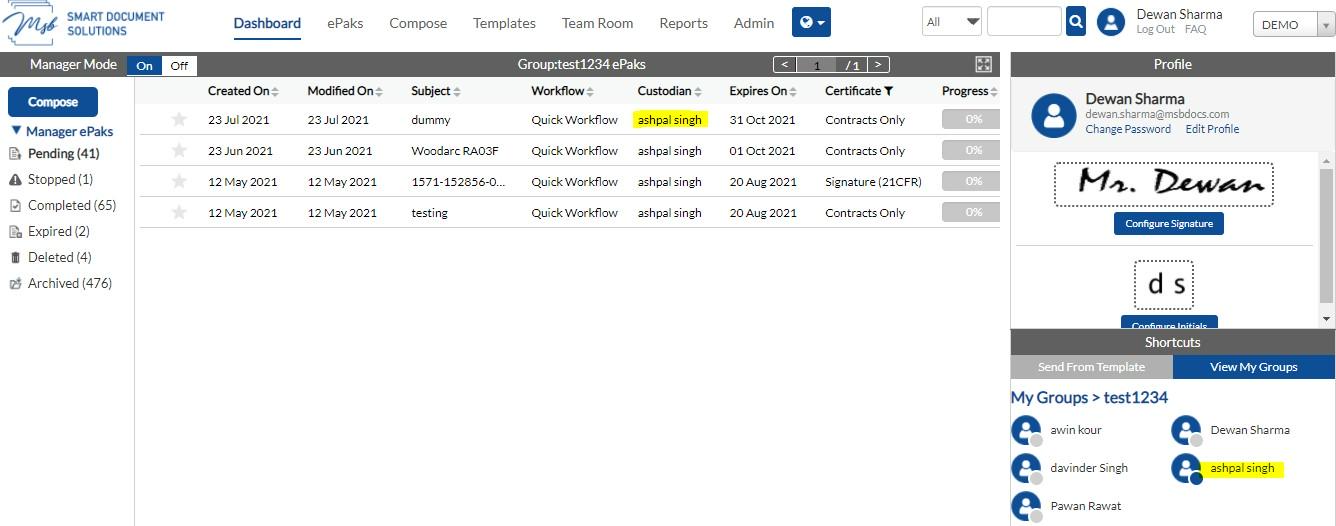
How do I access My Groups?
As a custodian, you will have access to view your Groups and the ePaks associated with it. The ‘Shortcuts’ widget on the Dashboard has an option to ‘View my groups’.
In this widget, clicking on view my group will display the list of groups that you are manager of. Choosing any specific group will show you all the members of that group only.
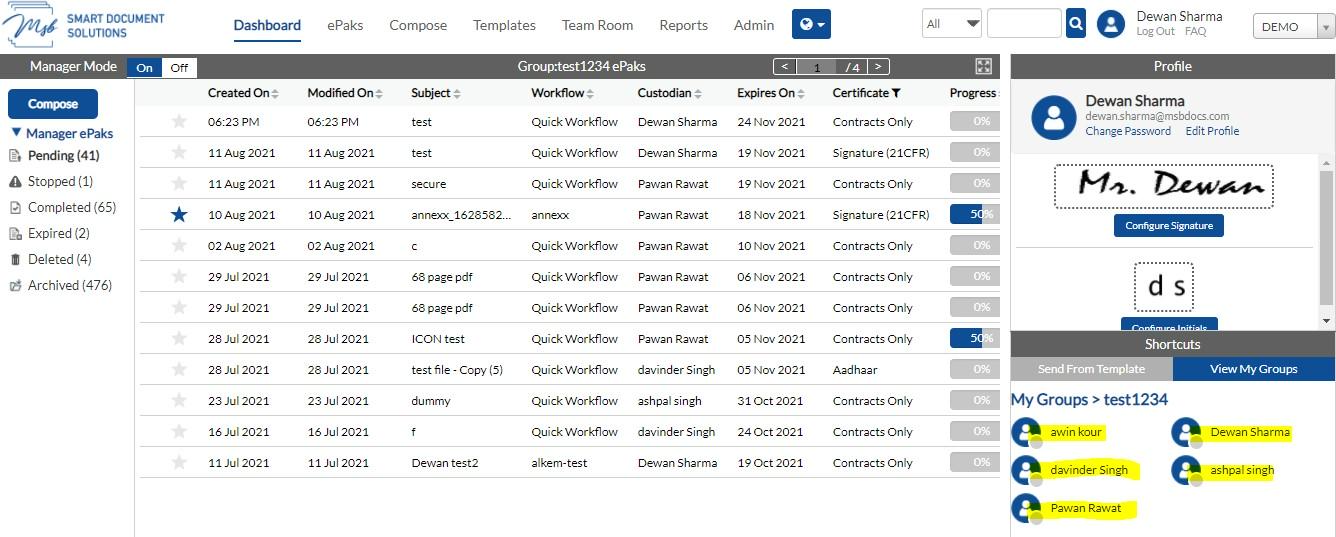
The dashboard then reflects ePaks (Pending, Stopped and Completed) only for these members of the group and you may sort the ePaks by selecting/deselecting each individual member of the group by clicking the sign on their Image Icon. The pictorial representation of the ePaks (Pie-Chart and Bar graph) will also reflect the changes. You may go back to the main ‘My Group’ screen by clicking on ‘My Groups’ link.
How do I access My Groups?
As a custodian, you will have access to view your Groups and the ePaks associated with it. Click on ePaks on the Dashboard and you will see an option to ‘View Groups’.

On this page, clicking on ‘View Groups’ will display the list of groups that you are manager of. Choosing any specific group will show you the ePaks (Pending, Stopped, Deleted and Completed) only for these members of the group.


Contact Us
Great, Thank you!
How do I view individual group member’s ePaks?
As a manager, you can only view ePaks that the group members are Custodian of. These will include Pending ePaks, Stopped ePaks and Completed ePaks. To do so:
- Click on the next to the group member’s Image Icon and all the ePaks will get filtered accordingly.
- You may select or unselect members as per your requirement.
- With every click, the ePaks will get filtered and will show ePaks only for the selected bunch of members of that group.
How do I view individual group member’s ePaks?
As a manager, you can only view ePaks that the group members are Custodian of. These will include Pending, Stopped, Deleted and Completed ePaks. To do so, Click Custom to filter the ePaks of individual group member

You may select the group members as per your requirement and click on Select. The ePaks will get filtered and only the ePaks for the selected group members will be displayed.

